Securing cargo
As a safety precaution, all cargo in your vehicle should be securely anchored to keep it from being thrown forward in the event of sudden braking, etc. The vehicle is equipped with eyelets in the cargo space to which straps or other cargo restraints can be attached.
WARNING
The eyelets are not to be used as passenger
restraints or as anchorages for child
restraints.
Consult your Volvo retailer about suitable accessories for this purpose.
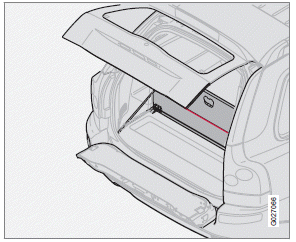
Remember that an object weighing 44 lbs (20 kg) produces a force of 2,200 lbs (1,000 kg) in a head-on collision at 30 mph (50 km/h)! Keep the following in mind when loading the vehicle:
• The load carrying capacity of your vehicle
is determined by factors such as the number
of passengers, the amount of cargo,
the weight of any accessories that may be
installed, etc. See the section "Vehicle
loading" in the chapter "Wheel and tires"
for more detailed information.
• Load the cargo against the backrest.
• Load heavy cargo as low as possible.
• If no one is sitting in the outboard rear
seat(s), reinforce the backrest by fastening
the seat belts.
• Never load cargo above the backrest without
a cargo net.
WARNING
When the rear backrest(s) are folded down,
the vehicle should not be loaded to a level
higher than 2 in. (5 cm) below the upper
edge of the rear side windows. Objects
placed higher than this level could impede
the function of the inflatable curtain.
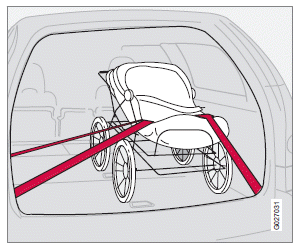
Attachment bracket
Nylon cargo net (accessory)
The Volvo XC90 can be equipped with a cargo net made of strong nylon fabric.
This net can be installed in two places:
• Behind the rear seat backrests (the second
row of seats in seven-seat models)
• Behind the front seat backrests if the rear
seat backrests (the second row of seats in
seven-seat models) have been folded
down.
Attachment eyelet in front seat rail
If the vehicle is equipped with the cargo area cover, lift the cover out of the vehicle before installing the cargo net.
1. The upper and lower rods of the cargo net
are hinged. Position the rods so that they
are straight and lock in position.
2. Insert the end of the upper rod in one of the
attachment brackets (see illustration in the
left column).
3. Insert the other end of the rod in the attachment
bracket on the opposite side of the
vehicle.
NOTE
On seven-seat models: When using the net
in the rear attachment brackets, be sure it is
installed in front of the side armrests.
4. Attach the lower straps to the eyelets on
the floor if the net has been installed in the
rear attachment brackets. Use the eyelets
in the front seat rails if the net has been
installed in the forward attachment brackets.
5. Adjust the straps to pull the net taut.
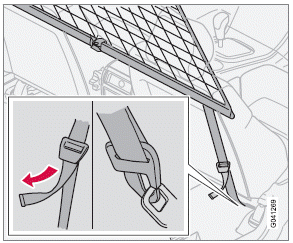
Folding and storing the cargo net
Press the release buttons on the hinges (1 in the illustration) and fold the net.
The cargo net can be stored under the floor of the cargo area on five-seat models.
WARNING
• Be sure the cargo net is properly
inserted in the attachment brackets and
the straps are correctly attached to the
eyelets and pulled taut.
• Do not use the net if it is damaged in any
way.
• When it is not in use, store the net so
that it cannot be thrown forward in the
event of sudden braking, etc.
Upper attachments
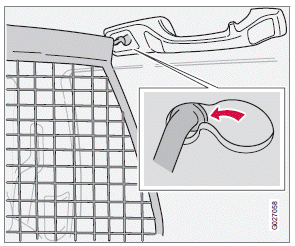
Steel grid (accessory)
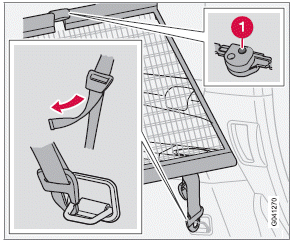
Installing the grid, upper attachments
1. Lift in the grid through the tailgate or
through one of the rear passenger doors (in
this case, fold down the rear seat backrests/
backrests in second row of seats in
seven-seat models).
2. Insert one of the grid's upper attachments
into an attachment bracket above one of
the rear passenger doors (see illustration
above).
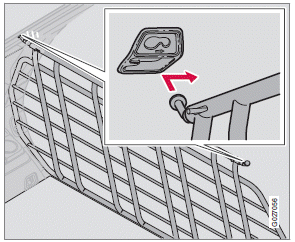
3. Push the grid's attachment into the forward
position in the attachment bracket (see
inset illustration above) to lock the attachment
in place.
Lower attachments
4. Insert the grid's other upper attachment in the attachment bracket above the opposite rear passenger door, and press the attachment into the forward position in the attachment bracket to lock it in place.
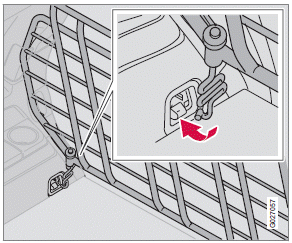
Installing the grid, lower attachments
1. Insert the lower attachment bracket
through the steel grid's lower mount from
underneath.
2. Install the spring on the attachment
bracket and tighten the knob.
3. Secure the attachment bracket hook in the
lower cargo eyelet. Turn the knob to tension
the attachment bracket in the cargo
eyelet.
4. Repeat the operation on the opposite side.
5. Tighten both attachment brackets alternatively.
6. Place the protective caps on the threads
above the knobs.
WARNING
• The backrests of the third row seats
must be folded down when installing
the steel grid.
• The steel grid is installed behind the
second row of seats. To avoid the risk
of injury, no one should be allowed to sit
in the third row of seats when the steel
grid is in place in the vehicle.
Cargo area cover
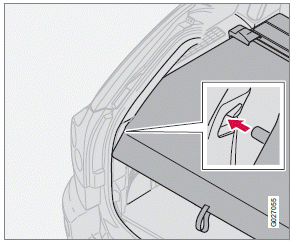
Installing the cargo area cover:
1. Press the end pieces of the cargo area
cover down in the holders.
2. Pull out the cargo area cover and hook it in
the holes in the rear cargo area pillars (see
illustration above).
Removing the cargo area cover:
1. Press the end pieces of the cover inward.
2. Pull up and lift out.
Grocery bag holder
1. Fold down the lower section of the tailgate.
2. Fold up the rear section of the cargo compartment
floor.
3. Hang or secure your grocery bags by
means of the straps or holders.
See also:
Audible signal
The Park Assist system uses an intermittent tone that pulses faster as you come
close to an object, and becomes constant when you are within approximately 1 ft
(30 cm) of an object in front of or ...
2011 Volvo C30 Review
I really enjoyed the 2011 Volvo C30. It's fun to drive, has an excellent
interior and it looks great after its recent redesign.
Now, if you're the sort of person who has to have a reason for every ...
Locking/unlocking the tailgate
Tailgate unlock button on the remote key
Unlocking the tailgate with the remote
key
- Press the tailgate unlock button on the
remote key to unlock (but not open1) the
tailgate. See also page ...