Label information

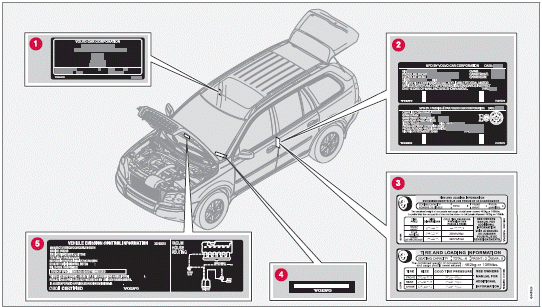
1 Model plate: includes e.g., Vehicle Identification Number (VIN), codes for color and upholstery, etc. The model plate is located on the rear side of the B-pillar (the pillar between the front and rear passenger doors) and the rear passenger's door must be open in order to see it.
2 Federal Motor Vehicle Safety Standards (FMVSS) specifications (USA) and Ministry of Transport (CMVSS) standards (Canada): Your Volvo is designed to meet all applicable safety standards, as evidenced by the certification label on the driver's side B-pillar (the structural member at the side of the vehicle, at the rear of the driver's door opening). For further information regarding these regulations, please consult your Volvo retailer.
3 Tire inflation pressures: This label indicates the correct inflation pressures for the tires that were on the vehicle when it left the factory. Canadian models have the upper decal; U.S. models have the lower one.
4 Vehicle Identification Number (VIN): The VIN plate is located on the top left surface of the dashboard. The VIN is also stamped on the right hand door pillar.
5 Vehicle Emission Control Information: Your Volvo is designed to meet all applicable emission standards, as evidenced by the certification label on the underside of the hood. For further information regarding these regulations, please consult your Volvo retailer
See also:
Exterior
The S60's lines make the car so much more modern and beautiful than the
average sedan. I especially love the look of the S60's rear end. The taillights
follow the lines of the trunk lid and keep t ...
Before a long distance trip
It is always worthwhile to have your vehicle checked by a trained and qualified
Volvo service technician before driving long distances. Your retailer will also
be able to supply you with bulbs, fu ...
Manually opening the fuel filler door
If necessary, the fuel filler door can be opened
manually:
1. Open the side hatch in the cargo compartment
(on the same side as the fuel filler
door).
2. Grasp the green cord with a handle.
...