Rearview mirror with compass


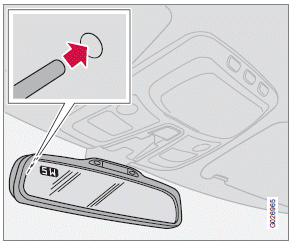
The upper left-hand corner of the rearview mirror has an integrated display that shows the compass direction toward which the car is pointing. Eight different directions can be displayed:
N, NE, E, SE, S, SW, W and NW. The display shows your car's orientation with respect to true north.
If the compass is activated, it will be displayed automatically when the ignition is in postilion II or when the engine is running. The compass can be switched off or on by pressing the inset button on the rear side of the mirror (see the inset illustration). This can be done with straightened paperclip or similar object. The button is recessed approximately 1 in. (2.5 cm) in the mirror.

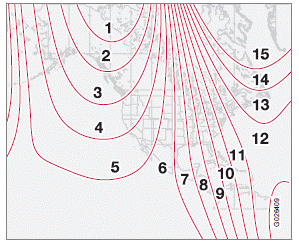
Magnetic zones
The earth is divided into 15 magnetic zones.
The compass is initially set for the zone to which the car was delivered, and should always be adjusted if the car is driven to a new magnetic zone. To do so:
1. Switch the ignition to position II.
2. Press the button on the rear side of the
mirror with straightened paperclip or similar
object for approximately 3 seconds until
ZONE is displayed. The number of the current
magnetic zone will also be displayed.
3. Press the button repeatedly until the number
for the desired zone (1 – 15) is displayed.

Calibrating the compass
After several seconds, the compass heading will again be displayed, and the change of magnetic zones is complete.
Calibrating the compass
1. Stop the car in a large, open area, away
from traffic.
2. Turn off as many electrical devices in the
car as possible to avoid interference with
the compass (e.g. audio system, etc).
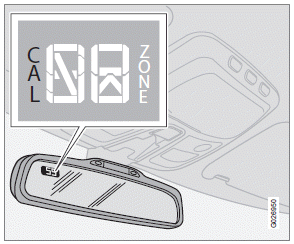
3. Using a pen or similar object, hold the button
(on the rear side of the mirror)
depressed for at least 6 seconds.
"CAL" will be displayed.
4. Drive slowly in a circle at a maximum speed
of 5 m.p.h. (8 km/h) until CAL is no longer
displayed.
NOTE
This step can also be done by driving normally
until CAL is no longer displayed.
Calibration is complete.
See also:
Overview
The V50 Sportswagon belongs to Volvo's versatile V-range, along with the
Volvo V70, and is produced at Volvo's plant in Ghent, Belgium alongside the V70
estate and S40 and S60 saloons. In the UK, ...
Windshield washing
Washing function
Move the lever toward the steering wheel to
start the windshield and headlight washers.
After the lever is released the wipers make several
extra sweeps. ...
Driving through water
The vehicle can be driven through water up to a depth of approximately 10
in. (25 cm), at a maximum speed of 6 mph (10 km/h).
Take particular care when driving through flowing water.
Clean t ...
