
Setting a time interval

The set time interval to vehicles ahead can be increased by pressing
 and decreased by pressing
 . The current time interval is shown
briefly in the display following adjustment.
. The current time interval is shown
briefly in the display following adjustment.
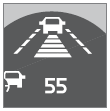 Different time intervals
can be selected and are shown in the display as 1–5 horizontal bars. The greater
the number of bars, the longer the time interval.
Different time intervals
can be selected and are shown in the display as 1–5 horizontal bars. The greater
the number of bars, the longer the time interval.
One bar represents a time interval of approximately 1 second; 5 bars is approximately 2.5 seconds. At low speeds, when the distance to the vehicle ahead is short, ACC increases the time interval slightly. In order to follow the vehicle ahead as smoothly as possible, ACC allows the time interval to vary considerably in certain situations.
 WARNING
- Only use a time interval that is suitable in current traffic conditions.
- A short time interval gives the driver limited reaction time if an unexpected situation occurs in traffic.
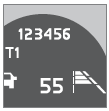 The number of bars indicating
the selected time interval are shown while the setting is being made and for several
seconds afterward. A smaller version of the symbol is then shown to the right in
the display. The same symbol is also displayed when Distance Alert is in active
mode, see page 165 .
The number of bars indicating
the selected time interval are shown while the setting is being made and for several
seconds afterward. A smaller version of the symbol is then shown to the right in
the display. The same symbol is also displayed when Distance Alert is in active
mode, see page 165 .
See also:
Unlocking a channel
A channel's access code is required to unlock
a channel.
Unlock all channels
This permanently removes all channels from
the locked list and makes them available for
selection.
Temporarily unl ...
Engine range
At launch, the Volvo S60 range will be available with a choice of two diesels
and one petrol engine. All the engines have been developed to meet the highest
demands on sporty, dynamic driving with ...
Climate control maintenance
Special tools and equipment are required to
maintain and carry out repairs on the climate
system. Work of this type should only be done
by a trained and qualified Volvo service technician. ...