Volvo Sensus
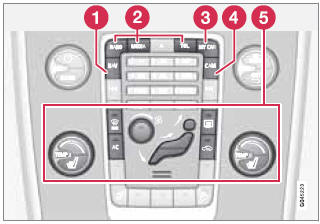
Center console control panel
1 - Volvo Navigation System (VNS)* – NAV: see the separate VNS manual for operating instructions.
2 - Infotainment (RADIO, MEDIA, TEL*): see the infotainment system overview beginning on page 206.
3 - Vehicle-related settings - MY CAR: see page 133.
4 - Park assist camera - CAM*: see page 191.
5 - Climate system: see page 139.
Volvo Sensus is the operating system in your vehicle providing a coordinated interface for a number of functions such as the individualized settings that can be made in the MY CAR menus, the climate and infotainment systems as well as other options such as the park assist camera(s), etc.
Volvo Sensus uses the screen in the center instrument panel to display information and selections are made using this panel’s controls and buttons. Certain features can also be controlled using the steering wheel keypad.
Press MY CAR to present all of the available settings related to driving and/or controlling the vehicle, such as City Safety, setting the clock, lock settings, etc.
Press RADIO, MEDIA, TEL, NAV* and CAM* to change a source and to activated systems or functions such as AM, FM1, CD, DVD, Bluetooth, navigation* and the park assist camera *.
See the respective sections in this manual for more detailed information about your vehicle's various features and functions.
See also:
The Inside
Like the exterior, the C30's cabin is highlighted by a design element,
specifically a flowing center control panel. It's similar to the one in the S40
and V50, and the thin panel is partially sepa ...
Trip odometers
Trip odometers and reset button
1 - Odometer display
2 - Button for toggling between T1 and T2, and for resetting the odometer
The trip odometers are used to measure short distances. A short pres ...
Switching off the engine
With the engine running, press the START/ STOP ENGINE button.
If the gear selector is not in the P position or if the vehicle is moving, press
the button twice or press and hold it in until the eng ...