The laser sensor

The upper decal describes the laser beam's classification and contains the following text:
Invisible Laser radiation – Do not view directly with optical instruments (magnifiers) – Class 1M laser product.
The lower decal describes the laser beam's physical data and contains the text:
IEC 60825-1:1993 + A2:2001. Complies with FDA performance standards for laser products except for deviations pursuant to Laser Notice No. 50, dated July 26th, 2001
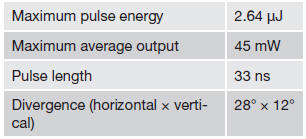
The laser beam's physical data is listed in the following table:
![]() NOTE
NOTE
The function of aftermarket laser detectors may be affected by City Safety's laser sensor.
![]() WARNING
WARNING
The laser sensor emits light when the ignition is in mode II or higher, even if City Safety™ has been switched off.
![]() WARNING
WARNING
Eye injury may occur if any of the following points are not followed:
- It is essential that all pertinent instructions be followed when handling laser instruments. Testing, repairing, removing, adjusting and/or replacing any components in the laser sensor may only be done by a trained and qualified Volvo service technician.
- Do not remove the laser sensor (including removal of the lenses). A laser sensor that has been removed belongs to laser class 3B according to standard IEC 60825-1. Devices in laser class 3B present a risk of injury to the eyes.
- The laser sensor’s connector must be disconnected before the sensor is removed from the windshield.
- The laser sensor must be mounted in place on the windshield before connecting the sensor’s connector.
- Do not view the laser sensor (which emits spreading, invisible laser beams) with optical instruments from a distance of less than 4 inches (100 mm).
See also:
Operation
Controls and display
1 Resume previous settings, increase speed (each additional press increases
speed by 1 mph (approximately 2 km/h).
2 Standby mode on/off
3 Set time interval
4 Put in activ ...
Infant seats
Securing an infant seat with a seat belt
Do not place the infant seat in the front passenger's seat
NOTE
Refer to page 47–48 for information on
securing a child restraint using ISOFIX/LATCH low ...
Accessory installation
• We strongly recommend that Volvo owners
install only genuine, Volvo-approved
accessories, and that accessory installations
be performed only by a trained and
qualified Volvo service technician.
...