Brake fluid

Location of the brake fluid reservoir
Checking the level
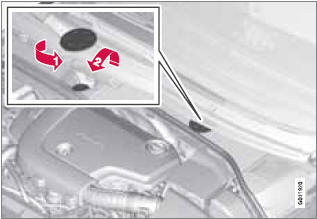
The fluid reservoir is concealed under the round cover at the rear of the engine compartment.
The round cover must be removed first before the reservoir cap can be accessed.
The brake fluid should always be between the MIN and MAX marks on the inside of the reservoir.
Check, without removing the cap, that there is sufficient fluid in the reservoir.
Fluid type: DOT 4+ boiling point >536 °F (280 °C), P/N 9437433
Replace: The fluid should be replaced according to the intervals specified in the Warranty and Service Records Information booklet.
When driving under extremely hard conditions (mountain driving, etc), it may be necessary to replace the fluid more often. Consult a trained and qualified Volvo service technician.
Always entrust brake fluid changing to a trained and qualified Volvo service technician.
WARNING
• If the fluid level is below the MIN mark
in the reservoir or if a brake-related
message is shown in the information
display: DO NOT DRIVE. Have the car
towed to a trained and qualified Volvo
service technician and have the brake
system inspected.
• Dot 4+ should never be mixed with any
other type of brake fluid.
Filling
1. Turn and open the cover.
2. Unscrew the reservoir cap and fill the fluid.
The level must be between the MIN and MAX marks.
See also:
Starting the vehicle
Starting the engine
WARNING
Before starting, check that the seat, steering
wheel and mirrors are adjusted properly.
Make sure the brake pedal can be
depressed completely. Adjust the seat if
ne ...
Interior design
'At only 4.26 metres long, the C30 is not a big car, but its spacious cabin
gives it a real big car feel,' says Mr Abrahamsson, Volvo C30 project director.
Volvo's iconic 'floating' centre console ...
It's the little things that count
Storage Compartments (Puny, Fair, Ample, Galore): Fair
Cargo/Trunk Space (Puny, Fair, Ample, Galore): Galore ...