Changing a wheel

1. Apply the parking brake and put the gear selector in P.
2. Take out the jack*, lug wrench*, the towing eyelet and the wheel cover removal tool* stowed under the floor of the trunk.
3. Remove the wheel cover (where applicable) using the removal tool or remove the wheel cover by hand.
4. Block the wheels that are on the ground with wooden blocks or large stones.
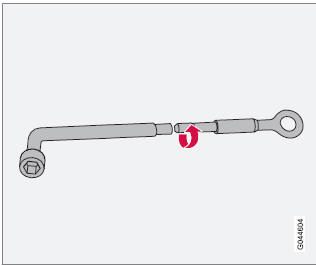
Lug wrench and towing eyelet
5. Screw the towing eyelet into the lug wrench as shown in the illustration.
CAUTION The towing eyelet must be screwed into the lug wrench as far as possible.
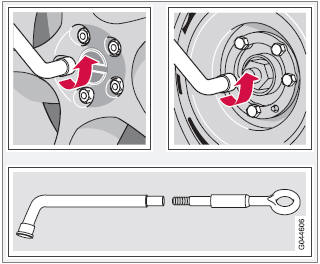
6. With the vehicle still on the ground, use the lug wrench/towing eyelet to loosen the wheel nuts ½ – 1 turn by exerting downward (counterclockwise) pressure.
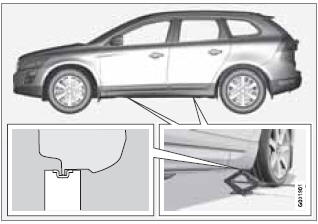 Jack
attachment points
Jack
attachment points
7. There are two jack attachment points on each side of the vehicle. Position the jack correctly in the attachment (see the illustration) and crank while simultaneously guiding the base of the jack to the ground.
The base of the jack must be flat on a level, firm, non-slippery surface. Before raising the vehicle, check that the jack is still correctly positioned in the attachment.
WARNING
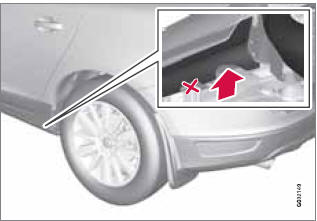
There are two attachment points near the
rear of the vehicle. Only the rear-most
attachment point is intended for the jack
(see the illustration).
8. Raise the vehicle until the wheel to be changed is lifted off the ground.
9. Unscrew the wheel nuts completely and remove the wheel.
WARNING
• The jack must correctly engage the jack
attachment.
• Be sure the jack is on a firm, level, nonslippery
surface.
• Never allow any part of your body to be
extended under a vehicle supported by
a jack.
• Use the jack intended for the vehicle
when changing a tire. For any other job,
use stands to support the vehicle.
• Apply the parking brake and put the
gear selector in the Park (P) position.
• Block the wheels standing on the
ground, use rigid wooden blocks or
large stones.
• The jack should be kept well-greased
and clean, and should not be damaged.
• No objects should be placed between
the base of jack and the ground, or
between the jack and the attachment
bar on the vehicle.
See also:
Installing the steel cargo grid
For information about the necessary tools and
procedures for installing/removing the steel
cargo grid, please refer to the assembly
instructions that were included when the grid
was purchased. ...
Introduction
The Park Assist Camera uses the display in the center console to show the area
behind the car while you are backing up.
PAC also shows guiding lines in the on-screen image to indicate the direction ...
Adjusting
1. Press the L button for the left door mirror
or the R button for the right door mirror.
The light in the button comes on.
2. Adjust the position with the joystick in the
center.
3. Press the ...