Basic infotainment functions

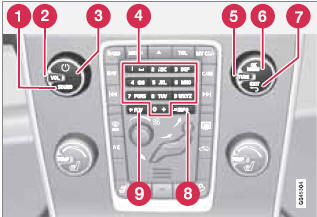
Controls in the center console for basic infotainment functions
1 SOUND: press this button to access the menu for adjusting bass, treble, etc. See page 212 for additional information.
2 VOL: Turn to raise or lower the volume level.
3  Short press: switch the system ON.
Press and hold: switch the system OFF. A short press when the infotainment system is on will mute/unmute the infotainment system sound.
4 Number key pad (used to e.g., select a preset radio station, enter letter/numbers when using a Bluetooth cell phone, etc.
5 TUNE: Turn in either direction to manually tune a radio station or navigate among the menu alternatives shown on the display.
6 OK/MENU: Press to confirm a selection or access the menus for the currently selected infotainment system mode (you can also choose to wait several seconds to automatically accept your selection).
7 EXIT: Go higher in the menu system, interrupt the current function, reject an incoming phone call or erase any characters entered in the display. From the highest level in the current menu, press and hold to go to the infotainment system's main menu view (see page 208).
8 INFO: Press this button to display additional information about a function, song, etc. See page 211 for more information.
9 FAV: This button can be used to store a shortcut to a commonly used function in AM/FM/SIRIUS/DISC, etc. See the section "FAV—storing a shortcut" on page 211 for information on using this button.
See also:
Dialing from a call list
The dialogue below enables you make a call from one of your cell phone's call
lists.
The user initiates the dialogue by saying:
Phone > dial from call list
or
Phone dial from call list
C ...
Booster cushions
Securing a booster cushion
Position the child correctly on the booster cushion
Booster cushions are recommended for children
who have outgrown convertible seats.
1. Place the booster cushion i ...
Installing the cover
1. Press the end piece on one side of the
cargo area cover into the retaining bracket
in the side panel of the cargo area 1.
2. Do the same on the opposite side 2.
3. Press both sides of the cov ...