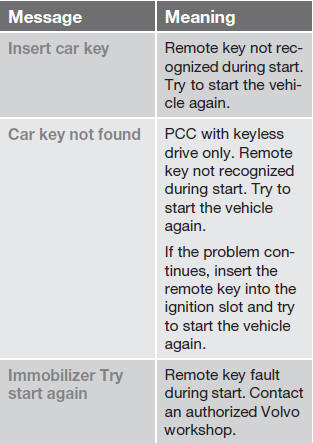
Immobilizer (start inhibitor)

Each of the keys supplied with your vehicle contains a coded transponder. The code in the key is transmitted to an antenna in the ignition slot where it is compared to the code stored in the start inhibitor module. The vehicle will start only with a properly coded key. If you misplace a key, take the other keys to a trained and qualified Volvo service technician for reprogramming as an anti-theft measure. The following messages (which may appear in the instrument panel display) are related to the immobilizer:
CAUTION Never use force when inserting the remote key in the ignition slot. The vehicle cannot be started if the transponder is damaged.
USA–FCC ID: LTQWFS 125VO
This device complies with part 15 of the FCC rules. Operation is subject to the following condition:
(1) This device may not cause harmful interference, and (2) this device must accept any interference received, including interference that may cause undesired operation.
Canada–IC: 3659A-WFS125VO
Operation is subject to the following conditions:
(1) this device may not cause interference, and (2) this device must accept any interference, including interference that may cause undesired operation of the device.
See page 112 for information on starting the vehicle.
See also:
Cordless headphones
1 Switch for selecting channel A (CH.A) or channel B (CH.B)
2 On/Off button
3 Volume
4 On/Off indicator light
Two sets of cordless headphones are included
with the RSE system.
The cordless he ...
General information
Location of the side impact (SIPS) airbags (front seats only)
As an enhancement to the structural side impact protection built into your vehicle,
it is also equipped with Side Impact Protection S ...
Fast forward/reverse
Press and hold the buttons to
fast
forward/reverse. This is done at one speed for
audio files but several speeds can be chosen
for video files. Press the buttons
several
times to increas ...