Brake fluid

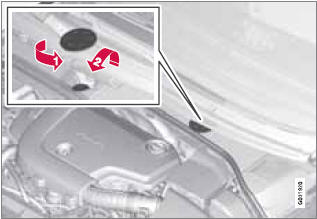
Location of the brake fluid reservoir
Checking the level
The fluid reservoir is concealed under the round cover at the rear of the engine compartment.
The round cover must be removed first before the reservoir cap can be accessed.
The brake fluid should always be between the MIN and MAX marks on the inside of the reservoir.
Check, without removing the cap, that there is sufficient fluid in the reservoir.
Fluid type: DOT 4+ boiling point >536 °F (280 °C), P/N 9437433
Replace: The fluid should be replaced according to the intervals specified in the Warranty and Service Records Information booklet.
When driving under extremely hard conditions (mountain driving, etc), it may be necessary to replace the fluid more often. Consult a trained and qualified Volvo service technician.
Always entrust brake fluid changing to a trained and qualified Volvo service technician.
WARNING
• If the fluid level is below the MIN mark
in the reservoir or if a brake-related
message is shown in the information
display: DO NOT DRIVE. Have the car
towed to a trained and qualified Volvo
service technician and have the brake
system inspected.
• Dot 4+ should never be mixed with any
other type of brake fluid.
Filling
1. Turn and open the cover.
2. Unscrew the reservoir cap and fill the fluid.
The level must be between the MIN and MAX marks.
See also:
Active chassis (Four C)
Active chassis, Four-C (Continuously Controlled
Chassis Concept), regulates the characteristics
of the shock absorbers so that the
car's driving characteristics can be adjusted.
There are three ...
Gasoline containing alcohol and ethers, "Oxygenated fuels"
Some fuel suppliers sell gasoline containing "oxygenates" which are usually alcohols
or ethers. In some areas, state or local laws require that the service pump be marked
indicating use ...
License plate lighting
1. Remove the screws with a screwdriver.
2. Carefully detach the entire bulb housing and pull it out.
3. Replace the bulb.
4. Reinsert the entire bulb housing and tighten the screws. ...